Skip to content
 Creating a plush toy that truly captures your brand’s identity is an exciting process—but it also requires precision. From your first concept sketch to the final production sample, effective communication with your factory determines everything: accuracy, quality, timing, and even cost.
When sourcing from overseas manufacturers, cultural and language differences can easily lead to misunderstandings. That’s why successful buyers develop clear, structured communication systems, complete with measurable design briefs, visuals, and defined revision processes.
This guide explains how to communicate your plush toy design requirements clearly and professionally—so your ideas are accurately turned into soft, safe, and market-ready products.
What Key Information Should Be Included in Your Plush Toy Design Brief?
A design brief is not just a reference document—it’s the project’s roadmap. It tells your factory what to make, why it matters, and how it must be done. The clearer your brief, the fewer mistakes occur later.
A professional design brief should describe:
- The purpose of the toy (gift, collectible, children’s product, or promotional item).
- The target market and age group, since this affects size, softness, and safety standards.
- The intended retail price or quality tier, guiding material and complexity selection.
- The art direction, including personality traits, color palette, and theme.
- The technical requirements, such as dimensions, filling type, and compliance standards.
Well-prepared buyers often include a product positioning note in their brief—explaining whether the toy aims to be luxury-grade, eco-friendly, or mass-market. This context helps factories propose better material and process solutions.
Another crucial point is safety compliance. If your toy will be sold in the EU or USA, mention EN71 or ASTM F963 testing from the start, as this influences material sourcing.
Sample Structure for a Plush Toy Design Brief
| Section | Information to Include | Why It Matters |
|---|---|---|
| Product Overview | Concept, usage, age group | Defines purpose and target audience |
| Visual References | Sketches, images, color codes | Aligns visual interpretation |
| Technical Specs | Dimensions, fabrics, stuffing | Guides production accuracy |
| Compliance | CE/ASTM/CPSIA requirements | Ensures safety and export readiness |
| Timeline | Sampling and production deadlines | Keeps project on track |
How Do Technical Drawings, 3D Models, and Reference Images Improve Communication?
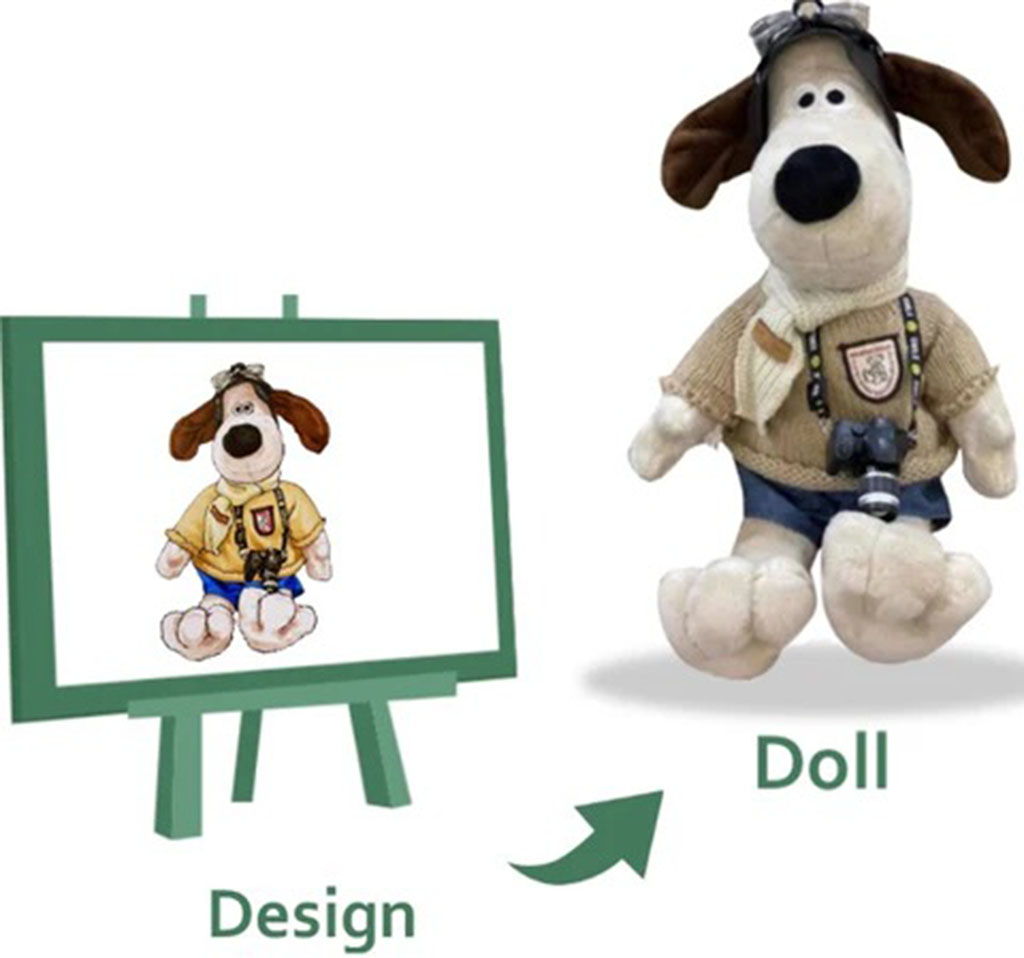
Even the most detailed email can’t replace a visual reference. Plush toy manufacturing depends on proportions, curves, and stitching patterns that must be interpreted physically. The more visual support you provide, the faster your supplier can translate your vision into a workable prototype.
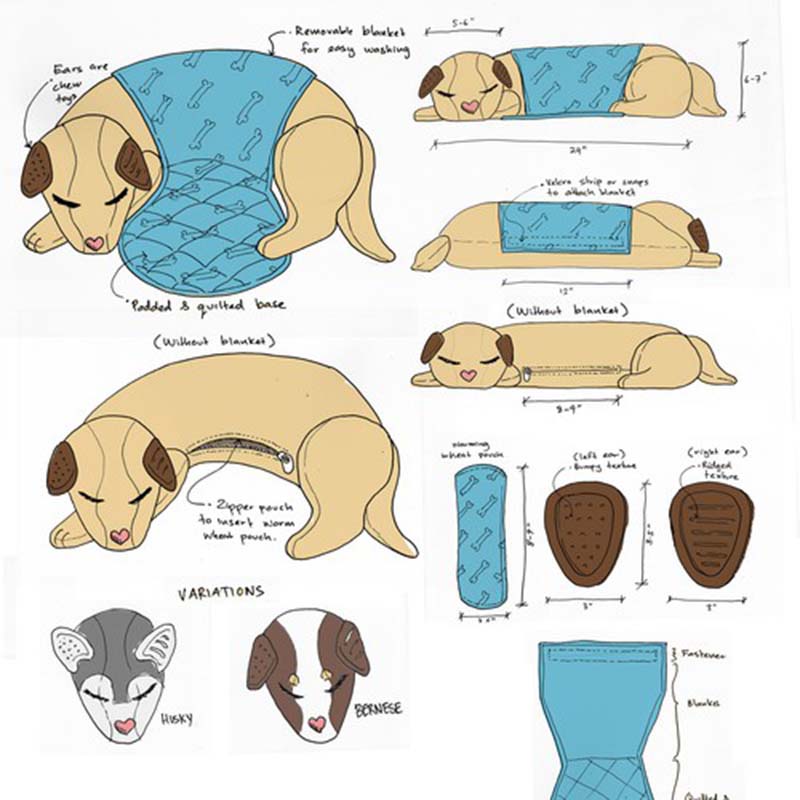
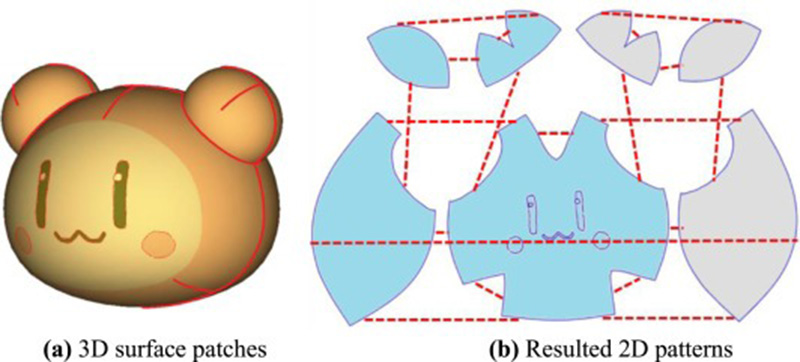
2D technical drawings show shape outlines, seam placements, and dimensions from different angles (front, side, back, top). For designs with complex structures—like animals with wings, tails, or accessories—these drawings clarify how parts connect.
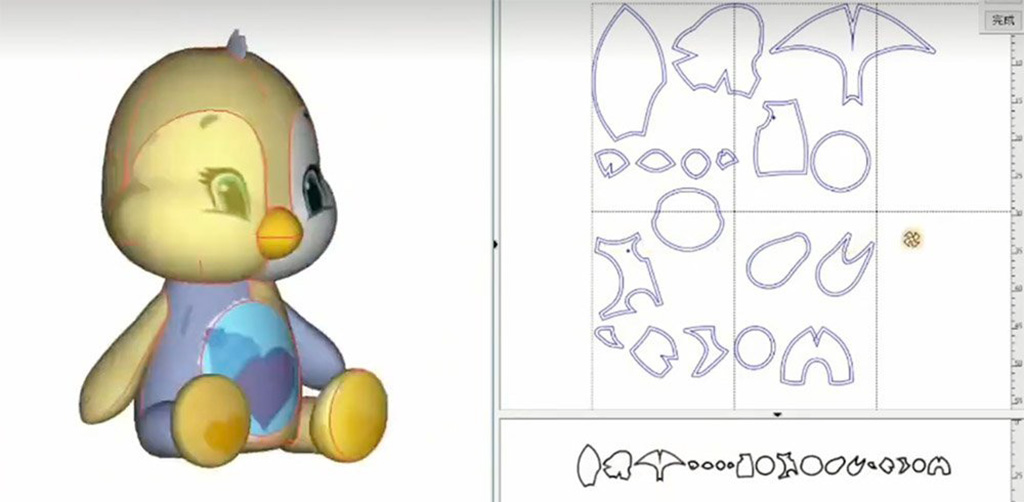
3D models, whether digital renders or hand-sculpted prototypes, give a sense of volume and expression. For factories using computer-aided design (CAD), 3D visualization helps adjust symmetry and ensures the toy maintains balance when stuffed.
Providing reference photos—such as mood boards or examples of similar toys—helps communicate emotional details like facial expression, style, or cuteness level. If you’re referencing a real object (like an animal or cartoon), mark the features that must remain accurate.
Factories like Kinwin often encourage clients to send physical samples or fabric swatches, especially for texture and softness reference. This tangible comparison helps avoid subjective interpretations of words like “soft,” “fluffy,” or “firm.”
Visual Communication Tools
| Tool Type | Description | Ideal Use Case |
|---|---|---|
| 2D Drawing | Flat sketches with dimensions | Simplified shapes and basic designs |
| 3D Model | Digital sculpt showing all angles | Complex or character toys |
| Physical Sample | Tangible reference toy | Texture, softness, proportion check |
| Photo Reference | Real object inspiration | Color or facial expression matching |
What Details About Materials, Fabrics, and Fillings Should Be Specified Clearly?

The choice of materials is what gives a plush toy its personality. Two toys with the same design can feel completely different depending on the fabric texture, filling density, and finishing details. That’s why this section of communication must be exceptionally precise.
Start by specifying the fabric name, composition, and pile length. For example, “short-pile velboa, 2mm, 100% polyester” is far clearer than “soft plush fabric.” If the toy will be used by children under 3 years old, choose anti-pilling and non-shedding fabrics that pass EN71 and CPSIA standards.
When it comes to filling, the most common options include polyester fiberfill, cotton, microbeads, and foam. Each offers different tactile and weight effects. Polyester fiberfill is ideal for general plush toys; microbeads are often used in weighted or sensory plush lines.
Don’t forget to specify the filling firmness—light, medium, or dense—since this determines how the toy feels when held.
In addition, list the accessories such as buttons, embroidery thread, or labels, and clarify if they must be child-safe or removable. For brand-conscious buyers, materials like RPET plush or organic cotton also help communicate sustainability values to end customers.
Common Plush Toy Material Options
| Category | Typical Choices | Notes |
|---|---|---|
| Fabric | Velboa, Minky, Faux Fur | Defines texture and appearance |
| Stuffing | Polyester Fiberfill, Cotton | Affects softness and volume |
| Accessories | Safety eyes, embroidery thread | Must meet safety standards |
| Eco Materials | RPET, Bamboo Fiber, Organic Cotton | For sustainable collections |
How Can You Align Expectations on Size, Color, and Finishing Techniques?
Even a 2cm difference in height or a slightly darker tone can make a plush toy look off-brand. That’s why accurate measurements, color references, and finishing specifications are crucial.
For size, always specify total height in centimeters, measured from the toy’s highest to lowest point (e.g., from ear tip to foot). Factories generally allow a tolerance of ±1cm due to fabric elasticity and stuffing variation.
For color, rely on Pantone TCX or TPG references rather than descriptions like “sky blue.” Send fabric swatches or request small fabric panels for approval before production. Be sure to check colors under neutral lighting or daylight simulation booths—artificial lighting can distort hues.
Regarding finishing, clarify stitching method (hidden seam, lockstitch), embroidery thread count, facial symmetry, and stuffing density. You can request “close-up QC photos” during sampling to confirm these finishing details before mass production.
Finally, make sure to communicate tolerance standards early—what’s acceptable and what’s not. This prevents unnecessary disputes later about small variations that naturally occur in hand-sewn items.
Key Visual Specifications
| Element | How to Specify | Factory Tip |
|---|---|---|
| Size | Use centimeters with tolerance | Approve sample before production |
| Color | Pantone code or swatch | Confirm under daylight color booth |
| Stitching | Straight or hidden seams | Request close-up photos for approval |
| Stuffing | Soft, medium, firm | Adjust during sample feedback |
What Role Do Sampling and Revision Feedback Play in Avoiding Misunderstandings?
Sampling is the most critical stage of communication between the buyer and manufacturer—it’s where ideas are tested against reality. Most plush toy factories, including Kinwin, go through two to three sampling rounds before mass production to ensure total alignment.
- First Sample (Prototype): Used to verify general appearance, proportions, and color matching. Expect visual differences at this stage; it’s about direction, not perfection.
- Second Sample (Pre-Production Sample): Reflects the final approved design, including all materials, size, embroidery, and filling. This becomes the “Golden Sample.”
- Mass Production Reference: All units produced will follow this Golden Sample exactly.
When reviewing samples, provide structured feedback. Number your comments and include photo annotations or markup notes to indicate exact changes. Avoid abstract feedback such as “make it cuter.” Instead, specify actions like “reduce eye distance by 0.5cm” or “add 10% more stuffing in arms.”
This measurable feedback format helps factories correct efficiently without guesswork, saving days of back-and-forth revisions.
Sample Review Checklist
| Sample Type | Main Focus | Buyer Action |
|---|---|---|
| First Sample | Shape, color, embroidery | Approve or revise with visuals |
| Second Sample | Final size, material, softness | Sign off as Golden Sample |
| Pre-Production | Final confirmation | Archive for QC reference |
How Can Digital Tools and Regular Updates Streamline Factory Communication?
Today’s plush toy development cycles are faster and more global than ever. To keep up, top buyers and factories rely on digital communication tools for visibility, traceability, and collaboration.
Use project management platforms like Trello, Notion, or Monday.com to track stages (quotation, sampling, testing, shipment). This ensures both teams share the same timeline and deadlines.
For visual feedback, use tools like Figma, Canva, or even PDF markup software to add comments directly on photos. This method eliminates confusion over email descriptions.
Instant messaging apps such as WeChat and WhatsApp are useful for quick updates—but always follow up important decisions by email to keep a documented trail.
Schedule weekly progress updates with photos or short videos showing current sample or production progress. Visual reports build trust and help identify potential issues early.
Finally, organize all files—briefs, drawings, and approvals—in a shared cloud drive (Google Drive, Dropbox, OneDrive). Version control helps prevent outdated files from being used accidentally.
Communication Management Tools
| Tool Type | Function | Advantage |
|---|---|---|
| Project Tracker | Timeline & milestone visibility | Keeps deadlines visible |
| Feedback Annotator | Visual comment sharing | Reduces revision errors |
| Cloud Storage | Document organization | Centralizes design data |
| Messaging App | Real-time updates | Fast problem-solving |
Conclusion
Every successful plush toy begins with clear communication. The more specific and visual your instructions are, the smoother the development process will be. From design briefs to sampling, alignment between brand and factory builds consistency, reduces risk, and enhances quality.
At Kinwin, we understand that communication is the core of great manufacturing. Our multilingual team, advanced sampling process, and digital project management tools ensure every detail of your plush toy design is accurately produced and delivered on time.
📧 Contact us at [email protected]
🌐 Visit kinwintoys.com
Let’s transform your creative ideas into market-ready plush toys—accurately, efficiently, and beautifully.