By Amanda — Kinwin (OEM/ODM plush manufacturer, CE & ASTM ready)
Turning a single photo into a huggable, three-dimensional plush is part art, part engineering. It blends digital modeling, materials science, and careful handcraft to capture the expression, colors, and personality in your image—whether it’s a pet, a child’s drawing, or a brand mascot. In this guide, I’ll walk you through the full journey: technology, design translation, materials, manufacturing, compliance, pricing, and packaging—so you know exactly how picture-to-plush projects succeed at scale.
What technology and design process make it possible to turn a picture into a stuffed animal?
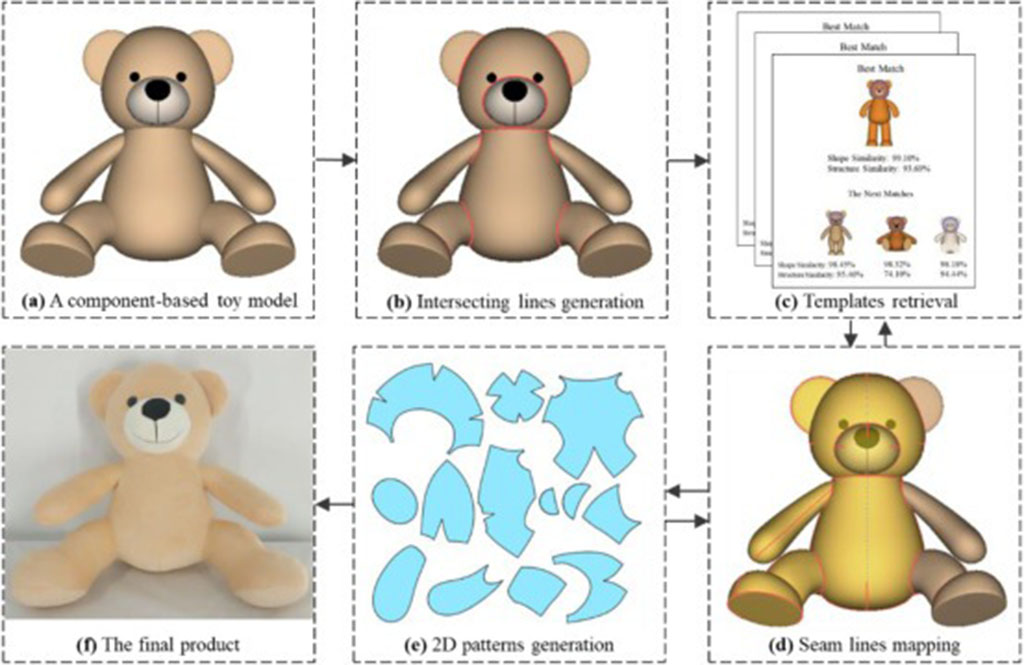
A photo is two-dimensional. Plush is volumetric. Bridging that gap starts with structured intake, continues with digital interpretation, and ends with precise soft-goods prototyping.
First, we gather reference assets: front, side, and back photos (or a sketch pack), color notes (Pantone if available), and any personality details that matter—ear tilt, eyebrow arch, body posture. Then our designers build a turnaround sheet and a panel map (how many fabric panels the form needs). For complex shapes, we create a low-poly 3D model to test volumes, then unwrap it into flat patterns. This makes seams predictable and keeps the face symmetrical when sewn.
Next, we produce a 1st prototype using the chosen fabrics, dialing in stuffing density and facial embroidery. We photograph the sample under neutral light for color proofing, collect your feedback, and iterate 1–2 rounds until approved. Only then do we lock specs for production: materials list, panel patterns, stitch types, thread specs, stuffing map, QC tolerances, and packaging dielines.
Table 1 — Picture-to-Plush Workflow at a Glance
| Stage | Your Input | Our Tools | Output |
|---|---|---|---|
| Asset intake | Photos, colors, size, notes | Checklists, Pantone swatches | Clear brief & target specs |
| 2D turnaround | Approvals on views | Digital sketch, vector linework | Front/side/back sheet |
| 3D evaluation (as needed) | Feedback on volume | Low-poly 3D, pattern unwrapping | Flat panel map & seam plan |
| Sampling | Comments on likeness | Fabric library, embroidery files | 1st & revised prototypes |
| Pre-production | Final sign-off | Tech pack, BOM, QC plan | Production-ready documents |
How do designers translate photo details into accurate plush patterns and shapes?
Designers “read” a photo for proportions, planes, and landmarks. The aim is not a literal photocopy, but a plush-friendly likeness that holds up when stuffed, hugged, and washed.
We start with the face triangle (eyes–nose–mouth). Micro-shifts of 1–2 mm in eye spacing or nose height can change the expression, so we define coordinates relative to seam lines. Next, we simplify curves into sewable arcs—too many harsh transitions create puckers; too few flatten the character. Complex markings (tabby stripes, freckles, gradients) get mapped to embroidery layers or digital print zones. For ears, tails, snouts, and muzzles, we test gussets and dart placements so the form inflates correctly with stuffing (no collapse at the bridge of the nose, no “bat ears” unless intended).
We also build a stuffing map: firmer in the nose or base for shape retention, looser in the body for cuddling, weighted pouches if stability is needed (for older-age products). Finally, we check how the silhouette reads from 2 meters away—because shelf impact matters.
Table 2 — Photo Detail → Plush Translation Map
| Photo Detail | Translation Technique | Why It Works |
|---|---|---|
| Eye sparkle/highlight | Satin embroidery + tiny contrast stitch | Keeps expression alive without plastic eyes |
| Fur markings (stripes/patches) | Digital fabric print + outline stitch | Sharp edges, wash-safe, no color bleed |
| Snout/muzzle volume | Gusset + targeted firm stuffing | Holds 3D shape under hugs |
| Ear tilt/asymmetry | Asymmetric pattern or dart | Preserves personality from the photo |
| Subtle color gradient | Printed base + light airbrush (where allowed) | Depth without heavy layers |
Which materials and fabrics work best for custom photo-based plush creations?

Material choice shapes both realism and compliance. We balance handfeel, durability, color accuracy, and market (baby, general retail, collectible).
- Minky/Velour (polyester): Smooth, colorfast, baby-friendly; ideal for crisp embroidery.
- Short-pile plush: Versatile texture for pets and mascots; great for printed markings.
- Faux fur (varied pile lengths): Necessary for long-haired pets; specify pile direction in the tech pack.
- Cotton or cotton-blend fleece: Natural look for eco lines; slightly less vivid in color.
- Accents: Felt or appliqué patches (stitched only; avoid glued elements for safety SKUs).
For fillings, polyester fiberfill is the standard. Foam inserts add structure (snouts, ears). Pellets/glass beads go in sealed inner pouches when a little weight helps posing—never loose.
Table 3 — Fabric & Filling Selector
| Component | Best For | Pros | Watch-outs |
|---|---|---|---|
| Minky/Velour | Baby/character | Soft, durable, easy embroidery | Shows oil stains if not pre-washed |
| Short-pile plush | Pets/mascots | Takes print well, consistent color | Avoid over-heat pressing on prints |
| Faux fur (long) | Long-hair breeds | Realistic texture, premium | Higher yield loss; mind pile direction |
| Cotton fleece | Eco lines | Natural handfeel | Color depth slightly muted |
| Fiberfill | All SKUs | Washable, hypoallergenic | Can clump if under-stuffed |
| Foam insert | Structural zones | Shape retention | Add drainage for washability |
| Sealed pellets | Stability/weight | Better posture, sensory feel | Age-grade limits; pouch QC critical |
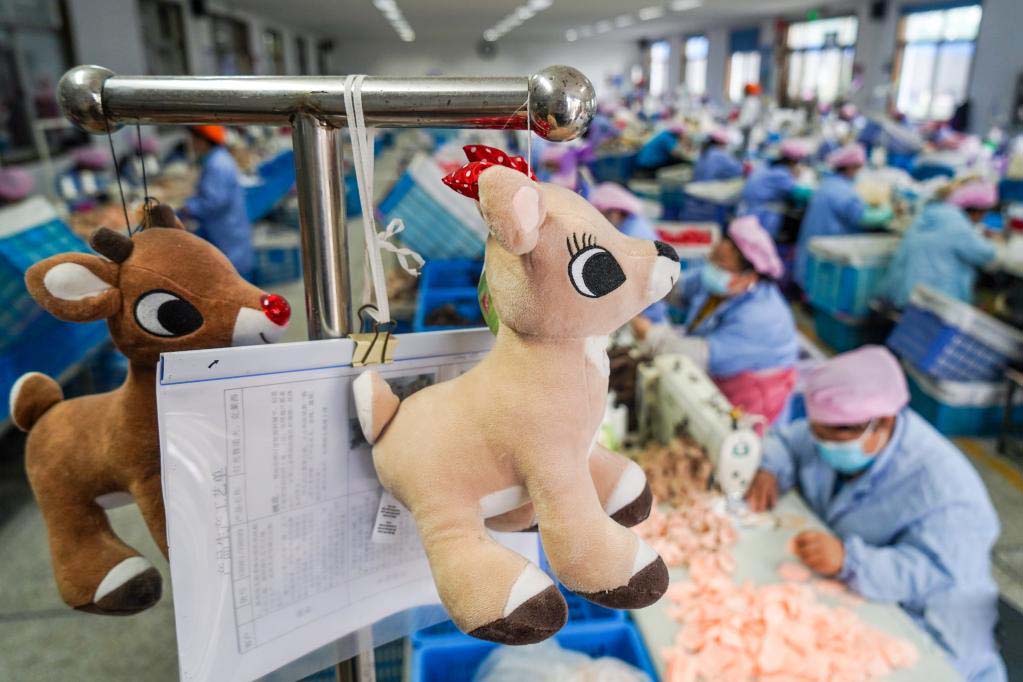
How do OEM & ODM manufacturers handle customization and quality control?

An OEM project starts with your finished concept; we execute precisely. ODM adds our design leadership—turning a single photo into patterns, stitch files, and fabric choices that manufacture cleanly.
Our QC model is layered:
- Material gatekeeping: lot-by-lot checks for colorfastness, fiber content, needle detection.
- In-process control: seam strength pulls at set Newtons, stitch density audits, embroidery alignment to ±1–2 mm.
- Stuffing density gauges: repeatable fill weights by zone to maintain likeness across the batch.
- Final AQL: visual, dimensional, rub/bleed checks, barcode and packaging verification.
We archive golden samples and digitals (embroidery files, print panels) so reorders match. For live approvals, we share neutral-light photos and 360° videos of PPS (Pre-Production Samples).
What safety certifications and production standards apply to personalized plush toys?
Personalized doesn’t mean exempt—compliance is mandatory for retail and promotional channels.
- EN 71 (EU) / CE: Mechanical/physical, flammability, migration of certain elements; colorfastness and saliva/sweat tests for baby items.
- ASTM F963 (US): Seam/attachment strength, small parts, sharp points/edges.
- CPSIA (US): Lead and phthalates; tracking label requirements.
- ISO 9001: Quality management; often required by major retailers.
- Age grading & labeling: Clear use instructions, fiber content, country of origin, and washing symbols.
Key rule: no loose pellets, no glued small parts on <36-month items, and weighted contents sealed in inner pouches. We document every batch with test reports tied to your PO for customs and marketplace onboarding.
How do pricing, MOQ, and lead time vary for picture-to-plush manufacturing?
Three forces drive cost: complexity, size, and materials. Accessories, printing, and custom packaging add both value and budget. MOQ depends on technique—plain embroidery needs fewer units than custom-dyed fur or specialty prints.
Table 4 — Cost, MOQ & Lead-Time Planner (Typical Ranges)
| Variable | Entry Line | Standard Retail | Premium Replica |
|---|---|---|---|
| Size (sitting height) | 15–20 cm | 20–30 cm | 30–45 cm |
| Fabrics | Minky/short-pile stock colors | Mixed pile + digital print | Faux fur + custom dye |
| Complexity | Simple face, 1–2 colors | Multi-markings, 3–5 colors | High detail, layered textures |
| Sample time | 7–10 days | 10–14 days | 14–21 days |
| Production lead | 25–35 days | 30–45 days | 40–55 days |
| Typical MOQ | 200–300 pcs | 300–600 pcs | 600–1,000 pcs |
| Unit cost impact | Low | Medium | High |
Notes: Add +5–10 days for peak seasons or custom packaging; add +3–5 days for third-party lab testing.
What packaging and branding options enhance the final presentation for clients?

Great plush earns great presentation. Packaging protects in transit and tells your story at first glance. Aim for a modular set—a base you can dress seasonally without reprinting everything.
Table 5 — Packaging & Branding Menu
| Option | What It Adds | Best Use |
|---|---|---|
| Window carton (SBS 350–400 gsm) | On-shelf visibility, dust protection | Retail & gifting |
| Drawstring fabric bag (cotton/linen) | Reusable, premium feel | DTC, boutique |
| Belly band + hangtag | Fast, low-waste branding | Market tests, craft lines |
| QR smart tag | Care video, story page, UGC | Community & post-purchase |
| Seasonal sleeve | Quick refresh without new cartons | Holidays, promotions |
Brand extras that convert: embroidered pet name, mini collar/bandana, adoption card inside the box, and a “fluff & care” postcard to reduce returns.
Conclusion
Yes—you can turn a picture into a stuffed animal, reliably and at scale. The secret is a disciplined flow: clean references, smart patterning, fabric choices that match the photo, tight QC, and certified safety. At Kinwin, we handle the full stack—ODM design, OEM production, lab testing, and retail-ready packaging—so your picture-to-plush projects look accurate, pass compliance, and arrive on time.
Contact me at [email protected] or visit kinwintoys.com to start your custom plush from picture. Let’s turn your image into a keepsake that hugs back.