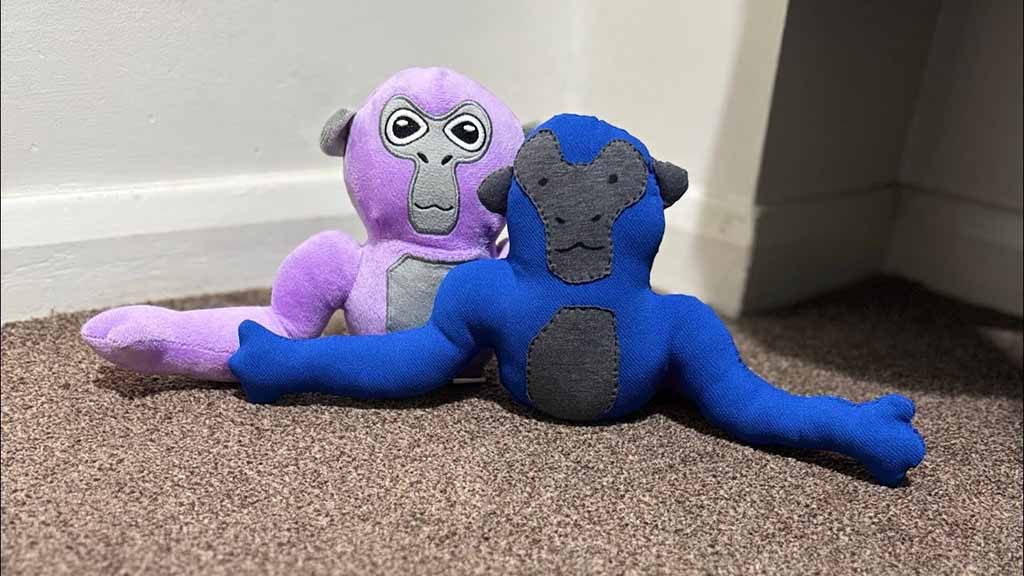
Many players love Gorilla Tag so much that they want a physical version of their in-game gorilla to sit on a desk or shelf. A handmade plush is a fun way to bring that feeling into the real world. As a manufacturer, I look at this process step by step: materials, pattern, sewing, stuffing, and quality checks.
A Gorilla Tag–style plush is basically a stylized gorilla: big head, simple body, long arms, and strong color blocks. When you break it down into simple shapes, it becomes much easier to sew, even at home. In this guide, I’ll walk you through how to make a fan-made Gorilla Tag–inspired plush for personal use, using the same logic we apply in factory development but with tools and methods that suit small studios and hobby crafters.
Note: this guide is for fan-made, non-commercial use. Gorilla Tag and its characters belong to their owners. For any commercial project, you would need formal permission or a license.
What materials and tools are needed to make a Gorilla Tag plush?
Before you think about patterns and poses, you need the right materials and tools. If these are wrong, sewing becomes hard, seams break, or the plush does not feel good in the hand. With a simple but complete kit, your work becomes smoother and your Gorilla Tag plush looks closer to a professional sample.
You can choose between very soft fabrics (like minky) or more structured fabrics (like short-pile plush). For your first attempt, I recommend short-pile plush or fleece, because they are easier to control around sharp angles like the face and fingers. Polyester fiberfill is ideal for stuffing because it is light and washable.
Recommended materials
Outer fabrics (choose one main and optional contrast colors):
- Short-pile plush / velboa (polyester) for body and limbs
- OR soft fleece (polyester or poly blend) for an easier beginner project
- Contrast fabric for face/mask area, chest patch, or hands if you want color-block details
Stuffing and interior support:
- Polyester fiberfill (standard toy stuffing)
- Small amount of felt or stiff fabric for face base (optional, to keep the mask area flat)
Details and trims:
- Embroidery thread (black, white, and any highlight colors) for eyes and mouth
- OR felt pieces for eyes and mouth, sewn around the edges
- Fabric for headband, hat, or cosmetic accessories (if you want to copy your in-game style)
Safety note: For younger children, avoid glue and small plastic parts. Use sewn-on or embroidered details instead.
Basic tools
- Fabric scissors
- Small thread snips
- Sewing needles (for hand sewing)
- Sewing machine (helpful but not required for small projects)
- Pins or sewing clips
- Fabric chalk or erasable marker
- Ruler and paper (for pattern drafting)
- Stuffing stick (a chopstick or blunt stick works)
Materials and tools overview
| Category | Items You Need | Why They Help |
|---|---|---|
| Fabrics | Short-pile plush or fleece + contrast colors | Soft surface, clear color blocks for Gorilla Tag style |
| Stuffing | Polyester fiberfill | Creates volume, keeps plush light and huggable |
| Details | Embroidery thread or felt for eyes and mouth | Safer, more durable than glued plastic parts |
| Sewing tools | Needles, sewing machine (optional), pins/clips | Allow clean, strong seams |
| Cutting & marking | Fabric scissors, small snips, chalk/marker | Accurate cutting and pattern transfer |
| Shaping tools | Stuffing stick, ruler, pattern paper | Help reach corners and keep proportions correct |
Once this kit is ready, you can focus on design without having to stop for missing supplies.
How do you design a pattern that captures Gorilla Tag proportions?
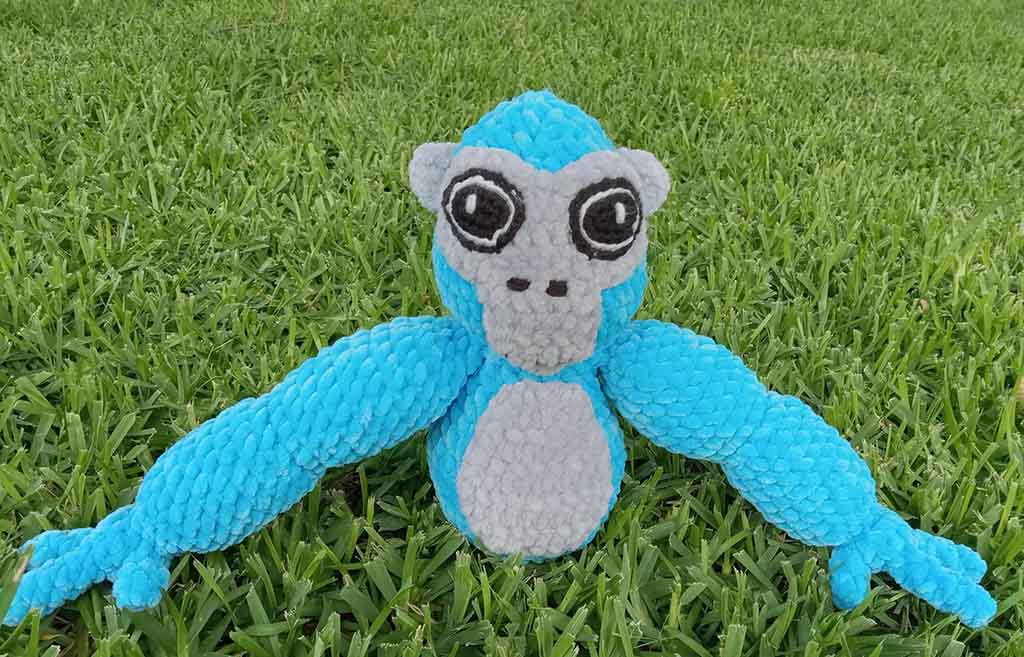
Gorilla Tag characters are simple but iconic: boxy heads, long arms, and clear color areas. If you try to copy every pixel, it becomes complicated. If you simplify into clean blocks and smooth curves, sewing becomes much easier and the plush still looks recognizable.
Think in three views: front, side, and back. The head can be almost a rounded block; the body a simple shape; arms long and slightly wider at the shoulder; legs short and simple. Your goal is not perfect game accuracy but clear, readable Gorilla Tag style in 3D fabric.
Step 1: define your plush size and pose
- Size: for your first plush, choose a height around 20–25 cm (8–10 inches).
- Pose: standing with slightly bent arms is easiest. Sitting poses require more pattern adjustments.
- Style: decide if you want chibi (bigger head, smaller body) or more balanced proportions.
Step 2: sketch the base gorilla
Draw a simple Gorilla Tag–style character on paper:
- Front view: block-like head, long arms, short legs, simple torso.
- Side view: slight forward lean if you like the game’s dynamic feeling, or straight up for easier sewing.
Mark key landmarks:
- Face area / mask panel
- Chest patch (if any)
- Arm length compared to body
- Leg length versus head size
Step 3: break the drawing into pattern pieces
Typical pieces:
- Head:
- Front head panel
- Back head panel
- Possibly a gusset (top strip) that connects front and back for a smoother dome
- Body:
- Front body panel
- Back body panel (with opening for stuffing or back seam)
- Arms:
- Two mirrored pieces per arm (front/back) OR one piece folded in half
- Legs:
- Same logic as arms: two-piece or one-piece folded
- Optional extras:
- Mask/face panel
- Chest patch
- Ears (stylized small triangles or rounded shapes)
Add seam allowance (usually 5–7 mm) around all pieces.
Pattern planning summary
| Step | What You Do | Result |
|---|---|---|
| Decide size & pose | Choose height and body stance | Clear goal for pattern scale |
| Sketch views | Draw front and side of gorilla body | Visual guide for proportions |
| Segment shape | Separate head, body, arms, legs, face panel | List of pattern parts you must draft |
| Draft pieces | Draw each piece with seam allowance | Paper templates ready to place on fabric |
| Test with scrap | Sew a quick mock-up in cheap fabric | Catch shape issues before cutting good plush |
If you have time, always sew a quick prototype from cotton or cheap fleece. It’s the fastest way to see if your Gorilla Tag plush feels right, and you can adjust patterns before using your final fabric.
What sewing and assembly methods ensure clean structure and durability?

Once patterns are ready, your next goal is strong, clean seams that hold up during squeezing and play. A Gorilla Tag plush will be handled often—thrown on beds, leaned on desks—so you want seams that don’t open and shapes that don’t twist.
If you have a sewing machine, use it for the long main seams; if not, strong hand stitches also work. In both cases, keep seam allowance even and avoid stretching the fabric too much as you sew, especially with slightly stretchy minky.
Assembly order for a Gorilla Tag–style plush
- Prepare small parts
- Sew ears (if separate), chest patches, and any decorative pieces.
- Turn these right side out and topstitch if needed.
- Add face details on flat head pieces
- Embroider or sew on eyes and mouth while the head front panel is still flat.
- Add the mask/face panel by appliqué if you use a separate color.
- Sew arms and legs
- Place arm pieces right sides together; sew around, leaving openings at the shoulder.
- Turn right side out and lightly pre-stuff the hands if you want more volume.
- Repeat for legs.
- Sew head
- Join front and back head panels (and gusset if used), leaving a small opening at the neck or base.
- Turn right side out.
- Sew body
- Attach chest patch on the front panel if you use one.
- Place front and back body panels right sides together; insert arms into shoulder seams and sew around the body, leaving an opening at the bottom or back for stuffing.
- Join head and body
- Insert neck into head opening or vice versa, right sides together.
- Sew around the neck seam carefully, then turn right side out through the body opening.
Helpful seams and stitches
| Stitch / Method | Where to Use It | Benefit |
|---|---|---|
| Straight machine stitch | Main seams on head, body, arms, legs | Clean, strong seam for everyday handling |
| Backstitch (hand) | High-stress areas, closing small gaps | Very strong line of stitching, good for curves |
| Ladder (invisible) stitch | Final closing after stuffing | Almost invisible finish, looks professional |
| Double stitching | Neck, arm joints, and base seams | Extra security where kids may pull or twist |
For clean structure, always clip curves and corners (cut small notches in seam allowance on curved areas) before turning pieces right side out. This lets fabric relax and follow curves without bunching.
How do you add facial details and character features accurately?
Face and color blocks define the personality of a Gorilla Tag–style plush. The eyes, mask area, and color contrasts need to match the character you see in the game, but they also need to be safe and easy to sew.
For home and small studio projects, I strongly recommend embroidery or felt appliqué for the eyes and mouth. Safety eyes or glued elements are less ideal for younger users and more risky if the plush is squeezed hard.
Plan your face layout
- Lightly mark center lines on the head front piece (vertical and horizontal).
- Decide where the mask area will sit: usually a slightly oval or trapezoid area around the eyes.
- Use a paper pattern to test eye positions before stitching.
Three safe methods for face details
1. Full embroidery (safest, most durable)
- Use embroidery floss or thicker polyester thread.
- Fill shapes with satin stitch or dense backstitch rows.
2. Felt appliqué with stitched edges
- Cut eyes and mask shapes from felt.
- Place on the fabric and stitch around all edges with small stitches.
3. Mixed technique
- Use a face panel in contrast fabric.
- Embroider eyes and mouth on top of that panel.
Character elements to include
- Eyes: clean shapes, high contrast, slightly large to read from a distance.
- Mask/face panel: clear edge lines; stitched securely.
- Color blocking on body: chest patch, arms, or legs in contrasting colors to match Gorilla Tag style.
- Accessories: simple headbands, hats, or bandanas to echo your in-game look. Keep these short and firmly attached if small children may play with the plush.
Facial detail checklist
| Item | Question to Ask | Adjustment If Needed |
|---|---|---|
| Eye alignment | Are eyes on the same horizontal line? | Shift one eye pattern slightly before stitching |
| Expression | Does the face look calm, fun, or strange? | Adjust mouth curve and eye spacing |
| Panel symmetry | Is the mask/face panel centered and even? | Reposition panel or redraw outline |
| Stitch security | Are all edges sewn with no gaps? | Add extra stitches in corners and curves |
Spend a bit of time at this stage; the face is the first thing anyone will notice about your Gorilla Tag plush.
How is stuffing applied to achieve stable shape and softness?
Stuffing decides how the plush will feel and stand. For a Gorilla Tag–style plush, you want a soft, hug-friendly body, but a head firm enough to keep the face flat and visible. Arms can be slightly softer so they move naturally.
It’s better to work with small tufts of stuffing and build up the volume gradually instead of pushing large chunks in at once. This helps avoid lumps and keeps the surface smooth.
Recommended stuffing approach
- Start with limbs
- Fill hands and feet first.
- Add stuffing along the length of arms and legs, keeping them soft but not floppy.
- Check that both arms and both legs have similar firmness.
- Stuff the head
- Begin at the far ends (ears, corners) and work inwards.
- Add more stuffing behind the face so the mask area stays stretched and smooth.
- Aim for medium-firm: the head should keep its shape but still compress slightly when you press it.
- Fill the body
- Add stuffing in layers from bottom to top.
- Test how the plush sits or stands as you go.
- Pay attention to chest and back so they feel balanced and not hollow.
- Check balance
- Stand or sit the plush on a flat surface.
- If it tips forward, add a little more stuffing in the back or base.
- If it leans back, adjust chest or legs.
Stuffing zones and firmness levels
| Area | Suggested Firmness | Reason |
|---|---|---|
| Head | Medium to firm | Keeps face flat and clearly visible |
| Body | Medium | Soft enough to hug, but stable on shelf or bed |
| Arms | Light to medium | Allows natural drape and poses |
| Legs | Medium | Helps plush sit or stand without strange bending |
| Accessories | Light | If stuffed (like headbands), keep them flexible |
After stuffing, massage the plush with your hands. This helps move fiberfill into small gaps and smooth out any visible bumps. Only when you are happy with the feel should you close the final openings.
How do you finish, reinforce, and quality-check the completed plush?
The last stage turns your Gorilla Tag plush from a “nice craft project” into something that feels close to a factory sample. You need to close openings neatly, reinforce stress points, trim threads, and do a quick quality check just like we do before shipping from a production line.
Finishing steps
- Close all openings
- Use ladder (invisible) stitch to close the body and head openings.
- Pull the thread gently so the seam disappears into the fabric surface.
- Reinforce high-stress areas
- Check neck, arm joints, and legs.
- If anything feels weak, add a few extra backstitches by hand along the seam.
- Trim threads and clean surface
- Cut all visible thread tails close to the fabric.
- Use a lint roller or tape to remove loose fibers, especially from faux fur or fleece.
- Optional: light surface grooming
- Gently brush the plush if you used longer pile fabrics.
- Reshape head and body with your hands.
Quick quality-check routine
| Check Area | What to Look For | Fix If Needed |
|---|---|---|
| Symmetry | Are arms, legs, and face balanced left to right? | Adjust stuffing or seam if difference is obvious |
| Seams | Any gaps, skipped stitches, or pulled threads? | Reseam or reinforce with hand stitching |
| Stuffing | Any hard lumps or empty spots? | Add/remove stuffing and massage to redistribute |
| Accessories | Are headbands, patches, or clothes secure? | Add more stitches, especially for children’s use |
| Safety | Any loose parts or sharp objects inside? | Remove and resew; never leave pins inside |
Before you call the plush finished, think about who will use it:
- If it is for display only, minor asymmetry is less important than overall look.
- If a child will play with it, durability and safety are more important than perfection.
If you plan to sell Gorilla Tag–inspired plush, remember you may need formal licensing and full toy safety testing for your target markets. For personal or gift use, you still should follow safe construction habits, but the regulatory requirements are not the same as for commercial distribution.
Conclusion
Making a Gorilla Tag–style plush is basically a small-scale version of how we develop any character plush in the factory: define the style, choose suitable materials, draft a simple but accurate pattern, sew with strong seams, stuff for balanced structure, and finish with careful details and checks. When you follow these steps, your fan-made gorilla can feel soft, stable, and full of personality—not just like a rough prototype.
At Kinwin, we use the same logic for OEM/ODM projects for global brands—from simple animal plush to complex mascots. If one day you want to move from handmade Gorilla Tag–inspired plush to fully licensed, factory-produced character lines, you’re very welcome to contact me at [email protected] or visit kinwintoys.com to explore how our team can support your design, sampling, safety, and mass production needs.