Embroidered eyes can change a stuffed animal from “just okay” to “truly loved.” They feel safe, look professional, and stay beautiful after many washes and hugs.
When brands and parents want safer alternatives to plastic safety eyes, embroidery is often the first choice. In this guide, I’ll walk you through tools, preparation, stitches, durability, eye styles, and how factories handle embroidery at scale—using clear, simple English so you can apply it in your own projects.
If you’re a brand owner, designer, or maker, understanding embroidered eyes will help you create plush toys that feel high-end, child-safe, and on-brand.
What tools and materials are needed to embroider eyes on stuffed animals?

Before you sew even one stitch, you need the right tools and materials. Good tools help you keep eyes symmetrical and clean. Good materials help you achieve sharp lines and long-lasting color.
I always start from the question: Who will use this plush? Babies, toddlers, older children, adults, or collectors? The age group affects which threads, needles, and stabilizers we choose, especially when we think about safety and durability.
A basic toolkit for hand embroidery is small and affordable. For factories, we expand to industrial embroidery machines and custom digitized designs.
Essential tools and materials
For hand embroidery on stuffed animals:
- Embroidery needles with sharp tips and suitable sizes for plush.
- Embroidery floss or strong polyester embroidery thread.
- Fabric marking tools: water-soluble pens, chalk, or disappearing ink.
- Embroidery hoop (if the fabric is flat enough before stuffing).
- Lightweight stabilizer or felt backing for very stretchy fabrics.
- Small scissors for trimming thread tails.
For machine embroidery (factory or advanced home setup):
- Embroidery machine with suitable hoops.
- Digitized design file for the eye pattern.
- Polyester embroidery thread (colorfast and strong).
- Stabilizers (tear-away, cut-away, or water-soluble, depending on fabric).
Table 1 – Tools and materials for hand vs machine embroidered eyes
| Category | Hand Embroidery | Machine Embroidery |
|---|---|---|
| Needle | Embroidery needle, sharp, size matched to fabric | Machine needle for embroidery, correct size/point |
| Thread | Cotton floss or strong polyester embroidery thread | Polyester embroidery thread (high strength, colorfast) |
| Stabilizer | Optional felt backing or light stabilizer | Tear-away or cut-away stabilizer under fabric |
| Marking tools | Chalk, water-soluble pen, disappearing ink | Marking for hoop alignment or pre-printing guides |
| Support tools | Small hoop (if working on flat fabric) | Embroidery hoop / frame on machine |
| Design file | Hand-drawn or printout as reference | Digitized eye design for consistent repeats |
With these tools ready, you can focus on placement, symmetry, and expression, instead of fighting with the fabric or thread.
How do you prepare the plush surface for clean and secure embroidery?
The quality of embroidered eyes depends a lot on what happens before you start stitching. If the fabric is unstable, very stretchy, or already stuffed too hard, it becomes much harder to get clean, even lines.
The main idea is simple: stabilize the fabric, mark the positions, and control the working surface. For factory work, we always embroider while the panels are still flat, before sewing and stuffing. For home projects, you may work either before or after stuffing, but “before” is usually easier.
Preparation steps for neat embroidered eyes
- Decide when to embroider
- Ideal: embroider on flat fabric pieces before assembly.
- Alternative: embroider on the stuffed head using careful tension and small stitches.
- Mark eye placement
- Use a water-soluble pen or light chalk.
- Mark center points for pupils and outline shapes for the eye.
- Check symmetry by folding the pattern or using a ruler between eyes.
- Stabilize the fabric
- Place a small piece of felt or stabilizer behind the eye area if the fabric is very stretchy or thin.
- For machine embroidery, hoop the fabric with stabilizer gently but firmly.
- Control the pile
- If the plush has long fur, comb or flatten the pile in the eye area.
- Some makers lightly trim the pile within the eye outline for sharper detail.
Table 2 – Plush surface preparation checklist
| Step | Action | Why It Helps |
|---|---|---|
| Choose timing | Embroider on flat panels where possible | Easier access, better control, more consistency |
| Mark eye locations | Use water-soluble pen and measure carefully | Keeps eyes level, aligned, and properly spaced |
| Add stabilizer | Felt backing or embroidery stabilizer | Reduces distortion and puckering |
| Manage plush pile | Comb, flatten, or slightly trim pile in eye area | Makes edges of eye shape clearer and cleaner |
| Test on scrap fabric | Practice stitches and tension first | Prevents mistakes on final toy |
A few extra minutes of preparation will save you much more time during stitching and avoid many “why does this eye look wrong?” moments.
What stitching techniques create symmetrical and expressive embroidered eyes?
Embroidered eyes do more than show that a toy is “alive.” They carry emotion: gentle, playful, sleepy, serious, or funny. The techniques you choose decide how smooth, clear, and expressive the eyes will be.
You can use many stitches, but a few basic ones cover most needs: backstitch, satin stitch, straight stitch, and French knots. With these, you can build outlines, fill areas, and add highlights.
Common stitching techniques for plush eyes
- Backstitch
- Ideal for outlines and lashes.
- Creates clean, strong lines with good control.
- Satin stitch
- Used to fill pupils or iris shapes.
- Gives a smooth, solid block of color.
- Straight stitch
- Good for small eyelashes, eyebrows, and shine lines.
- Quick and simple.
- French knots or small satin dots
- Create eye highlights for a “sparkle” effect.
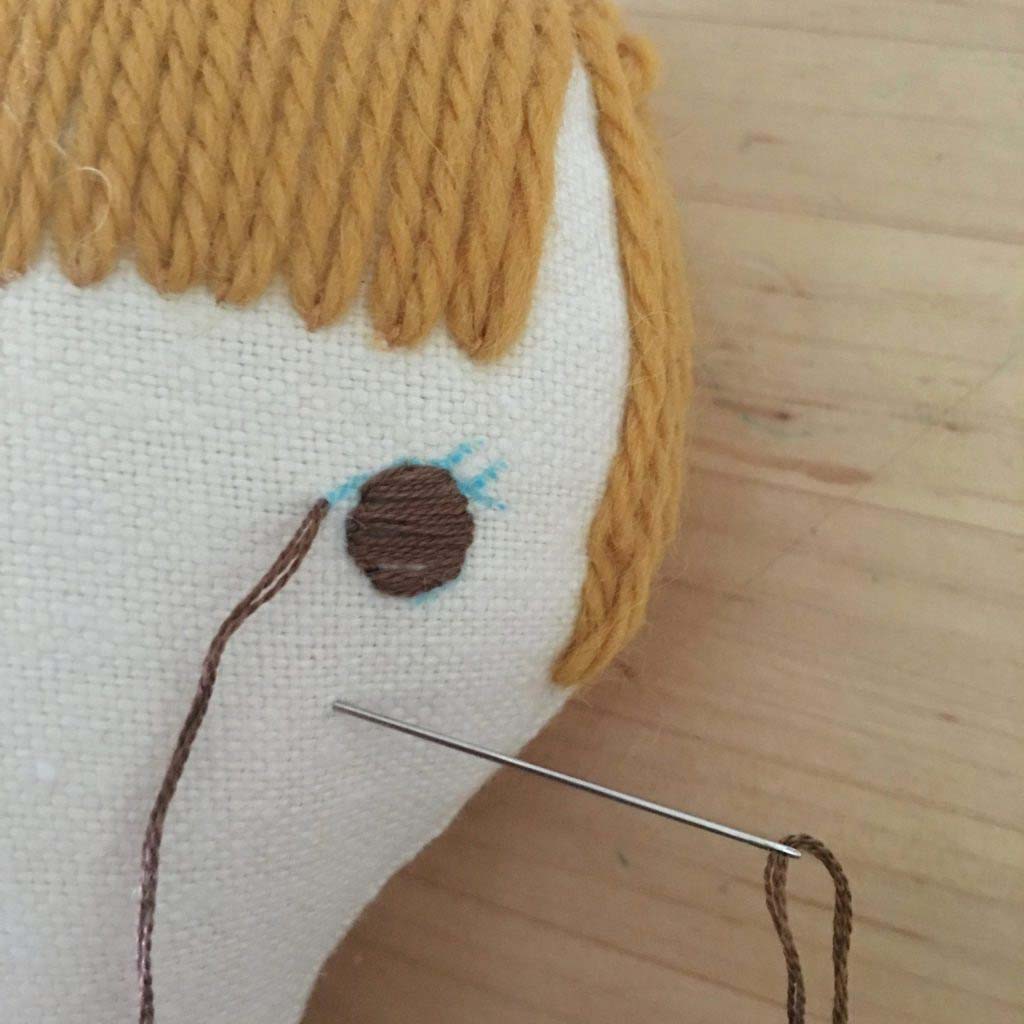
Steps for symmetrical, expressive eyes
- Outline the eye with backstitch along your drawn shape.
- Fill the pupil with satin stitch, keeping all stitches parallel and close.
- Add eyelids or lashes with backstitch or straight stitches.
- Add highlights using small satin stitches or French knots in a lighter color.
- Repeat on the other eye, counting stitches if needed for symmetry.
Table 3 – Stitch types and where to use them
| Stitch Type | Best Use in Eyes | Visual Effect |
|---|---|---|
| Backstitch | Eye outline, eyelids, lash lines | Clean, strong lines, good control |
| Satin stitch | Pupil, iris, solid parts of the eye | Smooth, filled-in areas with rich color |
| Straight stitch | Lashes, eyebrows, simple highlights | Quick, fine details |
| French knot | Light reflection dot or texture details | Gives a “sparkle” or playful texture |
| Split stitch | Alternative outline with softer texture | Slightly textured outline for softer look |
When you combine these stitches thoughtfully and keep your tension even, embroidered eyes can look professional and full of character, even on small plush faces.
How do you reinforce stitches to ensure durability and child-safe construction?
For plush toys, especially those for babies and toddlers, eyes must not only look good—they must be safe and durable. Children pull, chew, and rub toys. Threads must hold, and knots must stay buried inside the plush.
In our factory work at Kinwin, we treat embroidered eyes almost like structural seams: we use strong thread, secure knots, and backing where needed. For brands, this reduces the risk of loose threads, failed tests, and customer complaints.
Reinforcing hand-embroidered eyes
- Use strong thread
- Polyester embroidery thread is more abrasion-resistant than basic cotton.
- Anchor your thread deeply
- Start and end your stitching with knots or backstitching hidden inside the plush, not on the surface.
- Weave tails through existing stitches before trimming.
- Add backing
- A small felt patch or stabilizer behind the eye area reinforces stitches and prevents the fabric from tearing.
- Avoid very long, loose stitches
- Long surface stitches can catch on fingers or objects.
- Use shorter stitches packed closely for filled areas.
Reinforcing machine-embroidered eyes
- Use sufficient underlay stitches in the digitized design to lock thread to the backing.
- Choose stitch densities that are tight enough to cover the fabric but not so tight that they cut into it.
- Apply stabilizers correctly so fabric does not stretch or pucker.
Table 4 – Durability and safety practices for embroidered eyes
| Safety / Durability Focus | Recommended Practice | Benefit for Child-Safe Plush Toys |
|---|---|---|
| Thread strength | Use polyester embroidery thread | Resists fraying and breaking |
| Knot security | Hide knots inside, weave thread tails | Less chance of unraveling |
| Backing and stabilizer | Felt backing or cut-away stabilizer | Supports stitches, prevents tearing |
| Stitch length | Avoid long, loose stitches | Reduces risk of snagging and pulling |
| Density and underlay | Balanced density with proper underlay | Strong fill that holds shape and color |
| Testing | Gentle pull test on embroidery areas | Confirms eye details stay secure in use |
If you plan to sell plush toys in markets like the USA or Europe, strong embroidered eyes support your overall compliance with EN71, ASTM F963, and similar standards, especially for younger age groups.
How can different eye styles be achieved through design and thread choices?
Embroidered eyes are also a design language. With small changes in shape and color, you can move from baby-safe simple dots to detailed anime-style eyes or minimalist adult home décor characters.
When I work with brands, we often build an eye style library that matches their identity: cute and round for kids, simple and stylized for lifestyle mascots, or more detailed for collector plush.
Design variables for eye styles
- Shape – round, oval, almond, or stylized lines.
- Size – small for subtle looks, larger for “kawaii” or baby styles.
- Angle – slight tilt can make a character look shy, curious, or energetic.
- Color – black, brown, or dark grey for simple eyes; colored iris for more realism.
- Outline – thick outline for cartoon look, thin or no outline for softer look.
- Highlights – single dot, multiple dots, or no highlight.
Eye style examples
- Minimal dot eyes – small round satin stitched dots, often in black or dark brown. Very safe and simple, common in baby plush.
- Kawaii eyes – larger ovals with a dark pupil, highlight dots, and sometimes little eyelashes. Cute and expressive.
- Animal eyes – round or almond shapes with colored iris and darker pupil, sometimes layered details.
- Stylized line eyes – simple curved lines for closed or smiling eyes, good for lifestyle or sleep-themed plush.
Table 5 – Eye styles and design choices
| Eye Style Type | Shape & Detail | Best Use Case |
|---|---|---|
| Minimal dot | Small round satin stitch, no outline | Baby plush, minimalist characters |
| Kawaii / chibi | Large oval, outline, pupil, highlight, lashes | Cute children’s plush, fandom and character goods |
| Natural animal | Round/almond, colored iris, defined pupil | Realistic or semi-realistic animal plush |
| Sleepy / closed | Curved backstitch line with small ticks for lashes | Sleep-themed characters, pillows, baby toys |
| Graphic / stylized | Simple lines or geometric shapes, minimal shading | Lifestyle mascots, adult décor plush |
By fixing a consistent eye style for your brand, you make your plush toys immediately recognizable, even when you change animals, colors, and outfits.
How do manufacturers streamline eye embroidery for large-scale production?
In a factory, embroidered eyes must be not only beautiful and safe, but also repeatable and efficient across hundreds or thousands of pieces. That means moving from hand-drawn placement to digital files, repeatable processes, and strict quality checks.
At Kinwin, our standard for larger orders is to embroider eyes on flat fabric panels before we sew and stuff the head. This gives us clear access, consistent tension, and easy inspection.
Steps for large-scale eye embroidery in manufacturing
- Design and digitization
- We convert the eye artwork into a digitized embroidery file (.dst or similar).
- We adjust density, underlay, and sequence to match the fabric.
- Test runs
- We test on the actual fabric and stabilizer.
- We check for puckering, thread breaks, and color coverage.
- Panel cutting and hooping
- Either cut pieces first and hoop them, or embroider on larger fabric panels then cut after.
- Use precise positioning guides so eyes land in the correct place once the toy is assembled.
- Quality control during embroidery
- Operators monitor thread breaks, tension, and color.
- Random checks ensure eyes are symmetrical and positioned correctly.
- Integration with sewing
- Embroidered panels move to the sewing line.
- Sewers align seams and facial pieces based on notches that match the embroidery layout.
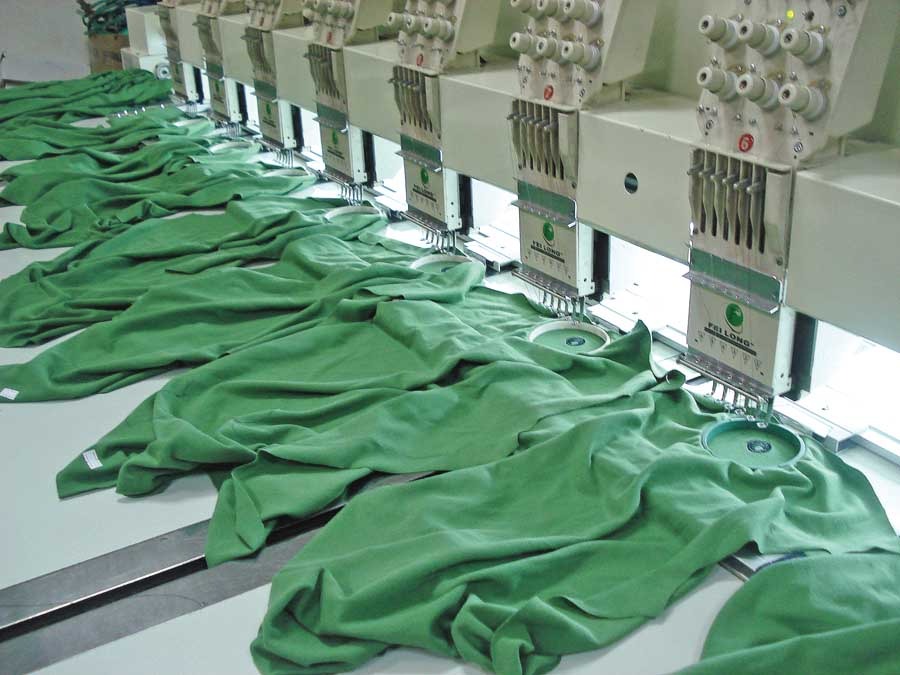
Efficiency and consistency methods
- Use multi-head embroidery machines to stitch the same eye design on many panels simultaneously.
- Arrange panels in nested layouts to reduce fabric waste.
- Build standard operating procedures for thread colors, machine settings, and stabilizer use.
Table 6 – How factories optimize embroidered eyes for production
| Production Step | Factory Practice | Benefit for Brands and Buyers |
|---|---|---|
| Design digitization | Convert art to machine-ready file | Consistent eye shape and style across batches |
| Pilot sampling | Test on real fabric and adjust | Avoids issues like puckering and poor coverage |
| Panel embroidery | Embroider on flat pieces with multi-head machines | Higher efficiency, less manual labor |
| Placement control | Use reference marks and patterns aligned to eyes | Eyes sit correctly on finished plush faces |
| In-line QC | Inspect samples from each run | Early detection of thread or design problems |
| Documentation | Record thread codes, settings, and layout | Easier reorders and design updates |
When this process is organized, you can scale from a small test order to a stable long-term line without losing the unique look and quality of your embroidered eyes.
Conclusion
Embroidered eyes are one of the most powerful details on a stuffed animal. They can make a toy safer, more expressive, and more durable—if you choose the right tools, prepare the surface well, use smart stitching techniques, and think carefully about style and production.
For brand owners and designers, investing time in eye design and embroidery is a simple way to raise the perceived value of your plush line. At Kinwin, we help global buyers translate character art into clear embroidered eye designs, develop safe and durable constructions, and then scale them in OEM & ODM production. If you’re planning a new plush project and want embroidered eyes that feel professional and on-brand, you’re very welcome to contact me at [email protected] or visit kinwintoys.com to explore how our factory can support your success.