Skip to content
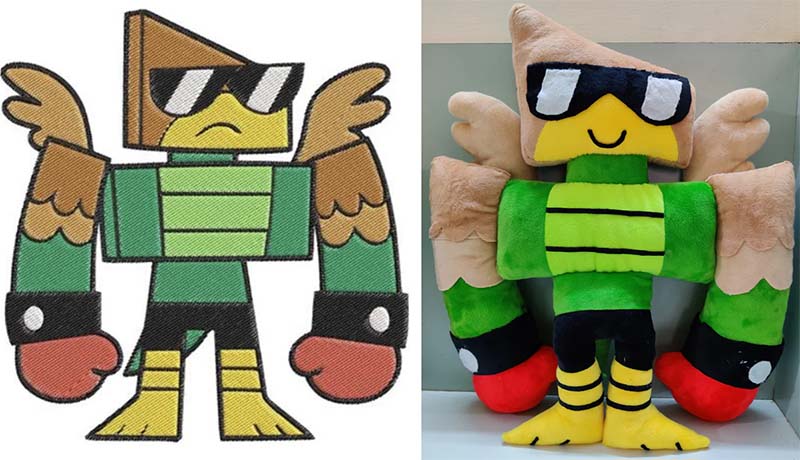
 Converting concept art into plush products is an exciting process, but it’s also one that requires careful planning and attention to detail. Concept art gives you the first glimpse of your plush toy idea—its character, form, and features. But taking that 2D drawing and turning it into a 3D, physical plush toy requires multiple steps, each one ensuring the product retains the charm and accuracy of the original art.
In this guide, we’ll walk you through the key steps in converting concept art into a plush toy, ensuring your plush product is as close to your vision as possible.
What is the first step in converting concept art into plush products?
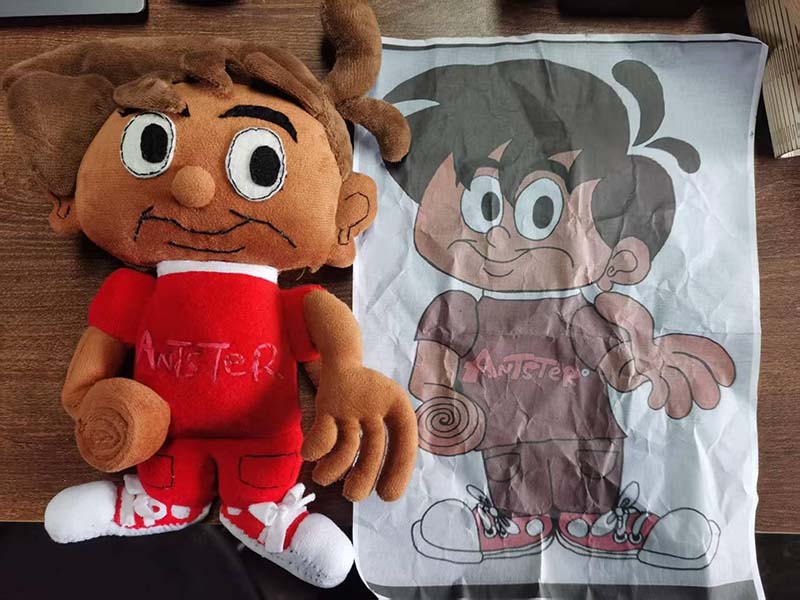
The first step in converting concept art into a plush product is to carefully review the art and define key design aspects. This is essential because concept art may not always be ready for manufacturing in its current form, so it needs to be broken down into actionable parts.
This process involves understanding what makes the concept art unique—the shapes, proportions, details, and character—and making sure that these elements can be effectively translated into a 3D plush toy.
Analyze the Design for Essential Features
To start, break the concept art into its core design elements. Focus on the key features that give the character personality and charm.
This includes:
- Facial expression and features (eyes, mouth, nose, etc.)
- Body structure (head size, body shape, limb placement)
- Accessories and clothing (hats, collars, shoes)
Each of these elements will need to be carried over accurately into the plush design. Think of it as a blueprint for the plush toy that needs to be re-imagined in 3D.
Identify Potential Challenges
It’s important to identify any potential challenges early on. For example, small, intricate details in the artwork may not translate well into plush form due to the limitations of fabric or stitching techniques. Overly complex shapes or designs may need to be simplified for manufacturability.
By identifying these challenges early, you can adjust the design to ensure a smooth transition into plush production.
Design Breakdown Checklist
| Feature | What to Clarify | Purpose |
|---|---|---|
| Face & Expression | Size and placement of facial features | Capture character personality |
| Body Shape | Proportions and silhouette | Maintain design integrity |
| Accessories | Items like clothing and hats | Consistent visual appeal |
| Small Details | Intricate design elements | Avoid manufacturing complications |
| Colors | Define main and accent colors | Maintain visual consistency |
How do you define size, proportions, and details before starting production?
Once you’ve reviewed the concept art, the next step is to define key details that are crucial for the production process. This includes establishing the size, proportions, and details that will guide the creation of the plush toy.
Proper size and proportion definitions are critical, as plush toys are soft, flexible, and dynamic products. If the size and proportions are not standardized, the final product might not match the visual appeal of the original design.
Define Size and Proportions for Accuracy
Start by determining the exact size of the plush toy—this includes overall height, width, and depth. Then, look at the proportions:
- Is the head large relative to the body?
- Are the arms and legs short or long?
- How do the proportions of the body align with the character’s personality?
These proportions must be clarified early to ensure the plush toy feels balanced and true to the concept art.
Set Clear Specifications for Details
Next, clarify smaller design details such as the size of eyes, mouth, or other facial features. This is crucial for the plush toy to resemble the character in the concept art. For example:
- Eye size: If the eyes are too big, the plush might look awkward in 3D form.
- Mouth and expression: Ensure that the mouth and overall facial expression are properly sized and positioned.
Setting clear specifications for these smaller details ensures the plush toy maintains its visual identity when manufactured.
Size, Proportions, and Detail Checklist
| Element | What to Define | Result |
|---|---|---|
| Overall Size | Exact dimensions (height, width, depth) | Consistent scale |
| Proportions | Head, body, limbs ratios | Accurate representation |
| Facial Details | Eye and mouth size, placement | Maintain character expression |
| Accessories | Confirm size and placement | Consistent visual appeal |
| Small Features | Size of buttons, seams, etc. | Avoid distortions during production |
How should material choices be made based on concept art?

The material selection for plush toys directly impacts both the visual appeal and feel of the final product. The concept art can give you a sense of texture, but you’ll need to choose fabric types and materials that match the intended design.
Material choices must be made carefully to reflect both the visual and tactile qualities seen in the concept art.
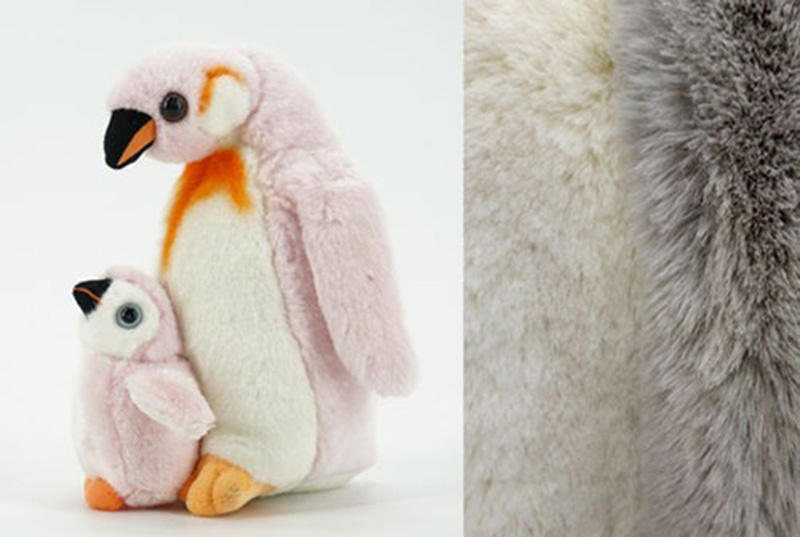
Matching Fabric to Design Aesthetics
The fabric you choose plays a major role in translating the visual aesthetic from the concept art into a plush toy. For example:
- If the illustration calls for a shiny appearance, fabrics like velvet or satin may be appropriate.
- For a soft, cuddly character, fabrics like minky or flannel may work best.
- If the design includes fur or furry textures, fabrics like teddy bear plush or faux fur will match the concept.
Choosing the right material helps ensure that the plush toy looks and feels like the character in the art.
Consider Durability and Use
When selecting materials, consider how the toy will be used. For example:
- Will the plush toy be played with or mostly used for display?
- Will it undergo frequent washing?
- Are there any durability requirements for certain parts, like clothing or accessories?
Selecting the right material ensures that the plush toy will stand up to its intended use while maintaining its intended look.
Material Selection Checklist
| Material Aspect | What to Consider | Result |
|---|---|---|
| Fabric Type | Match with visual texture (e.g., velvet, minky) | Accurate visual and tactile feel |
| Color Matching | Ensure fabric colors match illustration | Consistent design |
| Durability | Consider usage (e.g., play, washability) | Long-lasting product |
| Texture | Ensure fabric texture aligns with character | Authentic feel |
| Accessories | Select fabric for clothing and features | Visual accuracy |
How can you adjust the illustration to accommodate plush toy construction techniques?
While concept art provides a fantastic visual starting point, plush toys are three-dimensional objects made of soft, flexible materials. This means certain adjustments to the illustration may be needed to ensure it can be manufactured effectively while maintaining the overall look and feel.
Adjusting the illustration ensures that the final plush toy is buildable, durable, and faithful to the design.
Simplifying Intricate Details for Manufacturing
Some intricate design elements that look great in 2D might not be feasible or may require adjustments in the 3D version.
For example:
- Tiny lines or detailed features like small stitches, logos, or fine facial expressions might not hold up well in plush form due to fabric limitations. In these cases, the details can be simplified or adjusted to better translate to fabric.
- Sharp edges or pointed features, like hats, ears, or claws, might need to be softened or rounded to ensure they are durable during production and handling.
These adjustments help make sure the toy is manufacturable and ensures it retains its visual appeal in plush form.
Adapting Complex Shapes to Be 3D-Friendly
Plush toys are soft, and some shapes or parts of the design need to be adjusted to maintain structure and visual appeal. For example:
- Straight lines or sharp corners in 2D illustrations need to be adjusted to curves or soft angles in plush toys so the stuffing can fill them properly.
- Tiny limbs or delicate features may require slightly larger or reinforced shapes to ensure they hold their form after being stuffed and sewn.
By adapting complex shapes to be 3D-friendly, you can ensure that the plush toy retains its intended look, while being sturdy and properly shaped.
Adjusting the Illustration Checklist
| Adjustment Area | What to Modify | Result |
|---|---|---|
| Intricate Features | Simplify small or fine details | Clearer and durable design |
| Sharp Edges | Soften or round corners | Feasible construction |
| Complex Shapes | Adjust to 3D proportions | Maintain visual integrity |
| Small Parts | Resize or reinforce | Better durability |
| Detail Placement | Modify for easy manufacturing | Accurate translation |
What pattern-making techniques are required to replicate features from illustrations?
Once the concept art has been adjusted for construction, the next step is pattern-making. Pattern-making is the process of taking the 2D design and converting it into fabric panels that will later be sewn together to create the plush toy.
Certain techniques and considerations are necessary to ensure that the pattern accurately mirrors the original design while also allowing for practical production.
Converting 2D Features into 3D Shapes
Pattern-makers must adapt flat illustrations into 3D shapes, which involves adding volume, depth, and structure to the design.
For example:
- Head shapes might need to be made larger or more rounded to allow for stuffing.
- Limbs or body parts may require additional seam allowances to accommodate the 3D effect.
Patterns must also account for the fabric behavior—how it stretches, moves, or compresses when sewn and stuffed—so the final plush toy has the right shape.
Creating Patterns for Symmetry and Structure
When dealing with complex designs, ensuring symmetry is crucial. For example:
- Limbs and facial features should be mirror images of each other, so the pattern should account for this symmetry.
- The pattern must be accurately sized to ensure the plush toy’s shape stays consistent. This includes defining proper seam allowances and considering how each piece will fit together.
Patterns should be designed so that, once assembled, the plush toy holds its intended shape without being distorted by the seams or fabric stretch.
Pattern-Making Techniques Checklist
| Technique | What to Modify | Result |
|---|---|---|
| 3D Adjustments | Add volume to head, limbs, etc. | Maintain design integrity |
| Symmetry | Use mirrored panels for even sides | Balanced design |
| Seam Allowances | Adjust for fabric thickness and stretch | Accurate sizing |
| Panel Shapes | Modify for curves and 3D structure | Proper fit and form |
| Fabric Behavior | Account for fabric stretch/shrinkage | Durable final product |
How do you manage seam allowances and fabric thickness during production?
Seam allowances and fabric thickness are essential considerations in plush toy production. While these aspects may seem small, they can have a big impact on the final result.
Improperly managed seam allowances can affect size, shape, and proportions, while fabric thickness can lead to changes in volume and texture.
Adjusting Seam Allowances for Fabric Types
Seam allowances are essential for sewing the pieces together and ensuring the plush toy maintains its correct proportions.
- Thicker fabrics may require wider seam allowances to prevent the fabric from distorting during sewing.
- Stretch fabrics may require smaller seam allowances to avoid excess fabric or distortion when stitched.
By carefully managing the seam allowance based on the fabric type, the plush toy’s shape can be preserved, ensuring that the final product fits together properly and consistently.
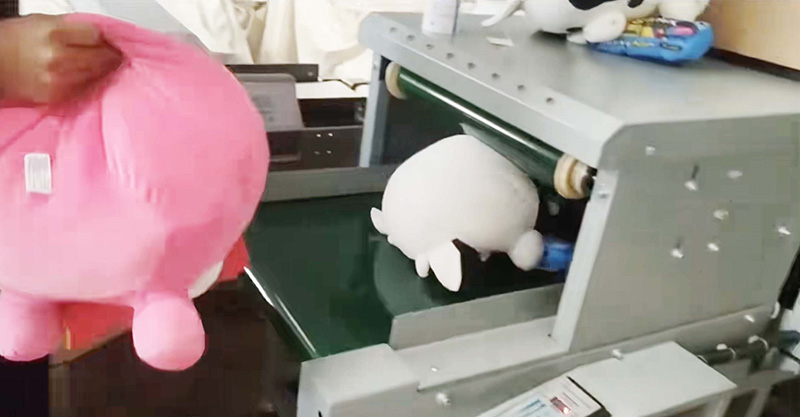
Fabric Thickness and Stitching Techniques
Fabric thickness impacts both the look and construction of the plush toy. When dealing with thicker fabrics, you may need to:
- Increase seam allowances to accommodate the extra bulk.
- Use special stitching techniques to ensure durability and neatness.
- Consider using reinforced seams for areas that will undergo more stress (like limbs or body connections).
These adjustments help ensure that the toy holds up during mass production, and that the final result matches the concept art.
Seam Allowance and Fabric Thickness Checklist
| Factor | What to Define | Result |
|---|---|---|
| Seam Allowance | Adjust based on fabric thickness | Proper shape and fit |
| Fabric Type | Choose fabric based on plush needs | Consistent texture and feel |
| Stitching Technique | Use appropriate stitch for fabric | Strong, neat seams |
| Reinforcement | Strengthen weak points | Durability in production |
| Volume Control | Manage fabric bulk | Maintain proportions |
Conclusion
Converting concept art into a plush toy is a multi-step process that involves careful planning and technical adjustments. By addressing key aspects such as size, proportions, materials, and pattern-making techniques, you can ensure that the final plush product accurately mirrors the original design while being manufacturable and durable.
At KINWIN, we specialize in guiding clients through every stage of the conversion process, from initial design to final production. Our expertise in material selection, pattern-making, and quality control ensures that your plush toys are crafted with precision and care.
If you’re ready to bring your concept art to life in plush form, our team is here to assist every step of the way.