A good plushie always starts from a good pattern. If the pattern is weak, even the best fabric and stuffing cannot save the final result. If the pattern is solid, your plushie looks balanced, cute, and professional—even when the design is simple.
In my daily work at Kinwin, I see how much time experienced pattern makers spend on measurements, curves, and small adjustments. In this guide, I’ll walk you through a clear, practical way to create plushie patterns—from first sketch to digital files—so you can turn ideas into shapes that really work.
What tools and measurements are needed to draft a plushie pattern?
Before drawing any lines, you need basic tools and a clear size plan. Good preparation saves a lot of frustration later. Even simple home tools can work if you use them in a careful way.
For a small studio or DIY project, focus on three areas:
- Drawing tools – to sketch and refine shapes.
- Measuring tools – to keep sizes and symmetry under control.
- Recording tools – to capture notes, sizes, and changes for future versions.
I always suggest deciding the target height and key widths of the plushie first (for example, total height 30 cm, body width 12 cm, head width 14 cm). Then all pattern pieces follow these targets.
Table 1 – Basic toolkit and key measurements
| Category | Items You Need | Why They Matter for Patterns |
|---|---|---|
| Drawing tools | Pencil, eraser, fine marker, curve ruler, straight ruler | For clean lines, smooth curves, and clear final pattern edges |
| Measuring tools | Tape measure, rigid ruler, grid paper | To track total height, body width, head width, seam allowance |
| Cutting tools | Paper scissors, fabric scissors | To keep paper and fabric edges clean and true to pattern |
| Fixing tools | Pins, clips, masking tape | To join paper pieces and test 3D shapes |
| Recording tools | Notebook, smartphone photos, labels on pattern pieces | To document sizes, version numbers, and changes |
| Key measurements | Total height, head width, body width, limb length, belly circumference | Set overall proportion and help you judge balance on the final plush |
When you treat pattern making like a small engineering task—not just an art sketch—you gain much more control over the final plush shape.
How do you translate a plushie concept into flat pattern pieces?

Turning a cute idea into flat pattern pieces is like taking a 3D sculpture and opening it into a paper map. The basic goal:
Break the plushie into simple volumes—head, body, limbs, ears, tail—and then draw flat “skins” that can wrap around these volumes once sewn.
A simple process looks like this:
- Define the silhouette – Draw front and side views of the plushie at the target size.
- Identify main volumes – Separate head, body, limbs, and other features.
- Decide piece count – For beginners, fewer pieces usually means easier sewing.
- Draw base shapes – For example, ovals for the body, circles/ovals for head side panels, long rounded shapes for limbs.
- Add darts or side panels – To turn flat shapes into round 3D forms.
Table 2 – From idea to flat pattern
| Step | What You Do | Result in Pattern Work |
|---|---|---|
| Concept sketch | Draw front and side view to scale | Clear plan of overall proportion |
| Volume breakdown | Divide into head, body, limbs, ears, tail, accessories | List of pattern “zones” |
| Shape selection | Choose basic shapes (oval, circle, rectangle with curves) | Simple starting forms that are easy to adjust |
| Panel strategy | Decide if head/body is 2-panel, 3-panel, or more | Controls how round and smooth the plush will be |
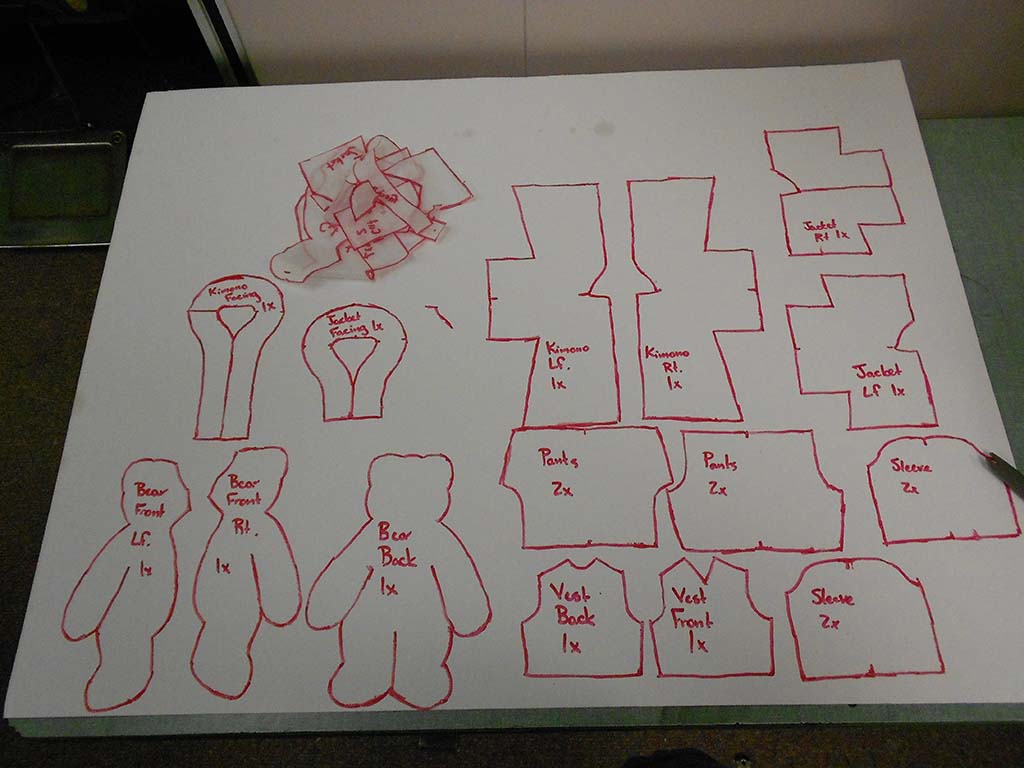
| Flat drafting | Draw outline of each panel on paper with reference lines | First-generation pattern pieces |
| Marking & labeling | Add grain line, fold lines, notches, and names to each piece | Easier sewing order and alignment during assembly |
For example, a simple round head can come from:
- Two side panels + one middle strip (a “gusset”) that runs from front to back; or
- Four curved panels that meet at the top, like a ball.
Both methods start from flat shapes but create different looks and stress points on the seams.
How do seam allowances and curvature shaping affect final form?
Seam allowance and curvature are small on paper but huge in reality. If seam allowances are not consistent, the final plush can become twisted or smaller than planned. If curves are not smooth, the plush can look bumpy or “sharp” instead of soft and round.
Seam allowance basics
- Standard plush patterns often use 0.5–1.0 cm seam allowance for small/medium toys.
- Use the same value on all main seams for stability.
- Mark seam allowance clearly on your pattern (and write the value).
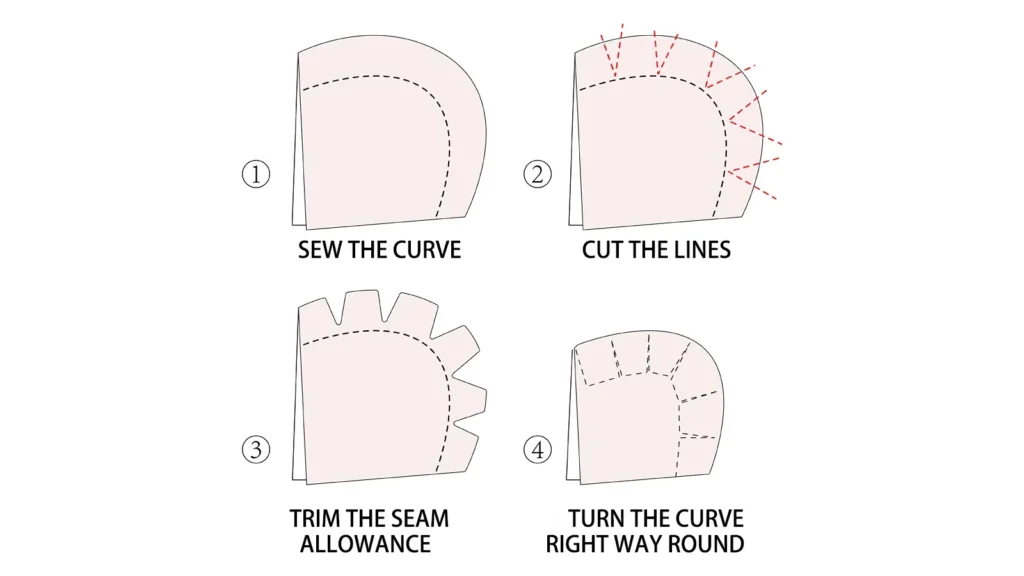
Curvature basics
- Gentle curves create soft, natural shapes.
- Tight or sudden curves can be hard to sew and may create puckers.
- For heads and tummies, use long, smooth arcs rather than tiny “steps.”
Table 3 – How seam allowance and curvature affect shape
| Factor | If Done Well | If Done Poorly |
|---|---|---|
| Seam allowance | Even, consistent width on all pieces | Uneven plush size, misaligned parts, twist |
| Curved seams | Smooth, gradual curves | Bumps, corners, and sewing difficulties |
| Corner treatment | Rounded instead of sharp 90° corners | Stress points that may tear or look angular |
| Edge matching | Notches help align curves correctly | Edges stretch differently, causing distortion |
| Stuffing behavior | Seams support a round form | Seams push back oddly, causing flat or lumpy areas |
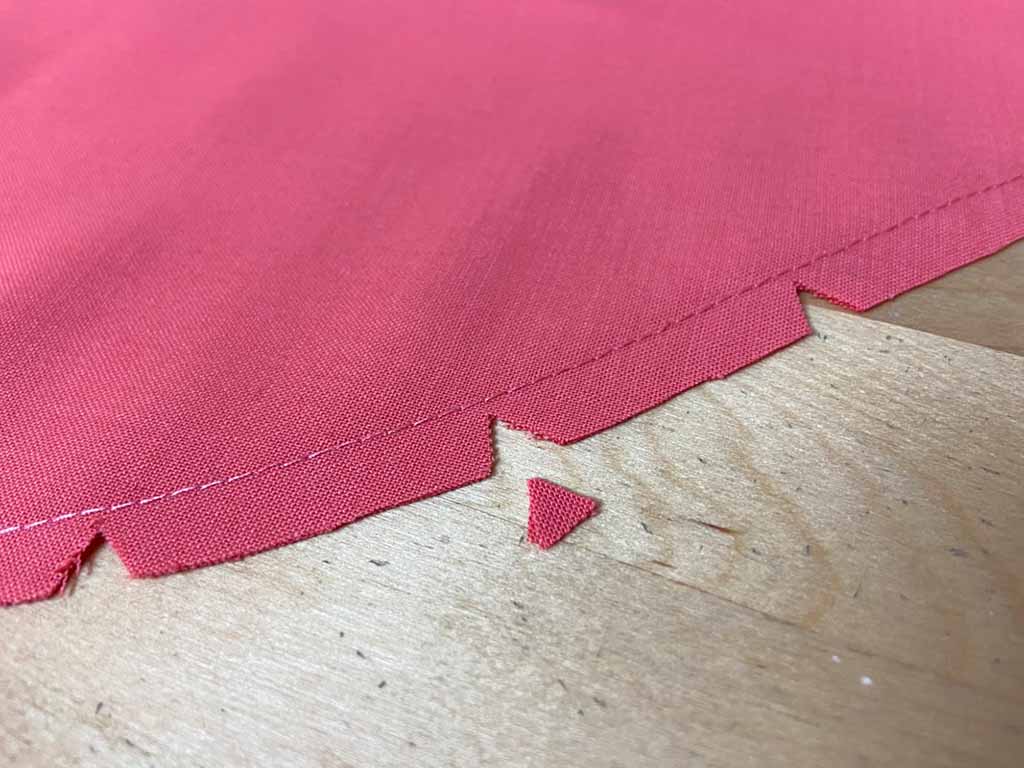
One very useful habit: add notches on key matching points along curved seams (for example, center front, center back, quarter points). These notches help you line up curves correctly during sewing so the finished shape matches your plan.
What techniques ensure symmetry and accurate proportion in patterns?
Symmetry is critical for plushies. If one side of the face is slightly bigger, or one ear sits higher, the plush can look unintentionally “off.” Some asymmetry can be a style choice, but for most designs, you want both sides to match.
Simple symmetry techniques
- Draw half, then mirror – Only draft half of a symmetrical piece (like the head front), fold the paper, and cut both sides at once.
- Use center lines – For each piece, draw and label a center line (vertical or horizontal) so you see the balance as you refine curves.
- Check against the concept sketch – Place your paper pieces over your front/side sketches to see if the outline matches.
Checking proportion
Proportion is about the relationship between head, body, limbs, and other features. To keep control:
- Decide key ratios, for example:
- Head height = 40% of total plush height.
- Body width = about 60–70% of head width for a chibi style.
- Use a ruler to check that your pattern pieces fit these goals (after subtracting seam allowance).
Table 4 – Methods to keep patterns symmetric and proportional
| Technique | How to Use It | Benefit for Your Pattern |
|---|---|---|
| Fold-and-cut method | Draw half shape on fold, cut both sides together | Natural symmetry for bodies, heads, ears |
| Center lines | Draw straight line down the middle of each piece | Easy to see if left/right sides are balanced |
| Measuring key ratios | Compare head, body, limb lengths with simple ratios | Stable design style (chibi, realistic, etc.) |
| Overlay check | Place pieces over concept drawing at full scale | Quick visual check for accurate silhouette |
| Paper assembly test | Tape paper pieces into a 3D mock-up | Helps see twisted or stretched shapes early |
At factory level, we also use pattern grading and templates for consistency between sizes, but the same logic starts with these simple hand methods.
How do you test and adjust a prototype pattern for better fit?
No pattern is perfect on the first try. Testing with a prototype (a sample plush) is the only way to see how paper decisions behave in real fabric. This step is where professional plush pattern makers spend a lot of time.
Step 1 – Make a “rough” sample
Use an inexpensive fabric with similar stretch and thickness to your final plush fabric. Sew carefully, but don’t worry about final colors or details yet. Focus on:
- Overall shape.
- Balance when standing or sitting.
- Head–body–limb proportion.
Step 2 – Mark problem areas
With the sample in your hands, look and touch:
- Is the head too flat or too long?
- Does the body bulge strangely?
- Do limbs hang at the right angle and length?
- Are seams smooth or wrinkled?
Use a marker or pins directly on the fabric to mark where you want more volume or less.
Step 3 – Transfer changes back to paper
Open your sample (if necessary), lay the pieces flat, and compare them to the original paper pattern. Adjust:
- Add or remove width in certain zones.
- Change curve shapes.
- Shift darts or seam positions.
Then create Pattern Version 2, clearly labeled and dated.
Table 5 – Prototype testing and what to adjust
| Observation on Prototype | Likely Pattern Problem | Typical Pattern Fix |
|---|---|---|
| Head looks too flat from front | Not enough width in side panels or gusset | Add width to head side pieces or central strip |
| Body sticks out too much at belly | Excess curve or width at belly seam | Reduce curve, trim width at belly line |
| Limbs twist when attached | Joint area shape not matching body seam | Refine joint curve, add notches for alignment |
| Plush leans forward or backward | Body–head connection angle is off | Adjust top of body or bottom of head pattern |
| Seams wrinkle along curves | Curve too sharp or seam allowance uneven | Smooth curve, correct seam allowance, clip notches |
At Kinwin, we repeat this prototype–adjust–prototype loop until the plush matches the client’s visual and functional expectations. Even for simple designs, 2–3 rounds are normal.
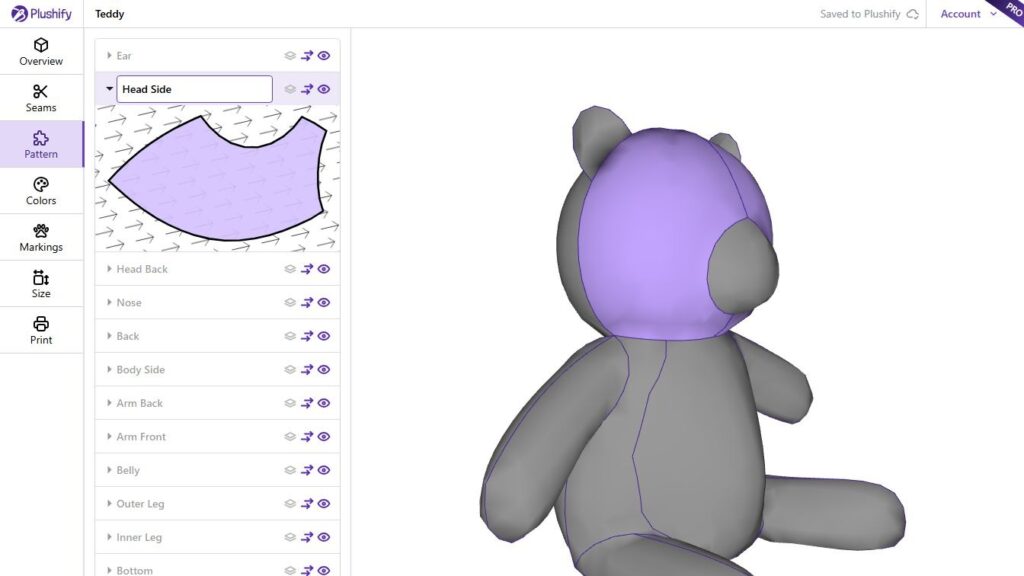
How do digital tools streamline plushie pattern creation and revisions?
Hand-drawing is still very powerful, especially at concept stage. But digital tools can save time and make revisions cleaner, especially when you work with factories, multiple sizes, or licensed characters.
Digital pattern making usually starts from one of two paths:
- Scan or trace hand-drawn patterns into software.
- Draft patterns directly in a computer program.
Once the pattern is digital, you can:
- Adjust curves with high precision.
- Mirror shapes perfectly.
- Quickly resize or grade patterns.
- Add seam allowances and notches automatically.
- Share clean files with your manufacturing partner.
Common digital tools and benefits
You don’t need to mention the exact software to your customers, but as a professional, it helps to know what is possible.
Table 6 – How digital workflows help plushie pattern work
| Digital Tool Type | Typical Use in Plushie Pattern Making | Main Benefits |
|---|---|---|
| Vector drawing software | Clean outlines, mirrored shapes, scaling | Smooth curves, perfect symmetry, fast edits |
| CAD / pattern software | Drafting panels, adding seam allowances, grading | Production-ready patterns with technical details |
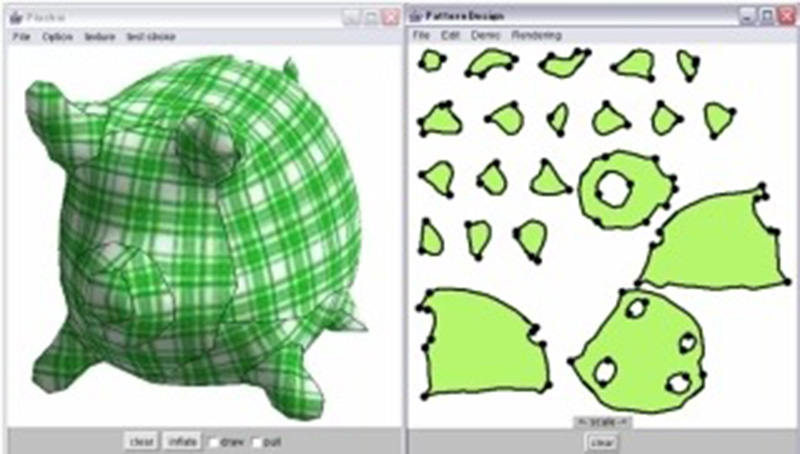
| 3D modeling tools | Build simple 3D shapes and flatten surfaces | Visualize volume before sewing |
| Digital tablets & stylus | Freehand drawing with digital control | Natural drawing feel plus easy corrections |
| Cloud storage & sharing | Store pattern versions and share with factories | Clear version control and easier collaboration |
In our factory, we often start with the designer’s hand sketch, turn it into a 2D pattern, test a physical prototype, and then digitize the final version. That makes it easier to:
- Repeat orders consistently.
- Adjust sizes for different markets (small, medium, large).
- Keep a record of all approved pattern versions.
For you as a brand owner or designer, digital patterns mean less risk of losing key files and fewer mistakes when scaling up production.
Conclusion
A strong plushie pattern is the hidden structure behind every cute toy. When you choose the right tools, plan measurements, translate 3D ideas into clean flat pieces, control seam allowances and curves, check symmetry, test prototypes, and use digital tools for revisions, your plushies will look more professional and sew more smoothly—whether you produce ten pieces or ten thousand.
At Kinwin, my team and I bring this pattern-first mindset into every OEM & ODM project. We help global buyers refine character proportions, pattern structure, and stuffing plans so their plush lines are not only adorable but also stable, repeatable, and ready for international production. If you’d like support turning sketches into factory-ready plushie patterns, you’re welcome to contact me at [email protected] or visit kinwintoys.com to explore how our factory can work with you.